Jul 2015
Silly Scope RF Sampler
24/07/15 18:47
Well I did threaten getting the oscilloscope working. I have borrowed the club scope to assist in the calibration, which incidentally seems to have worked a treat.
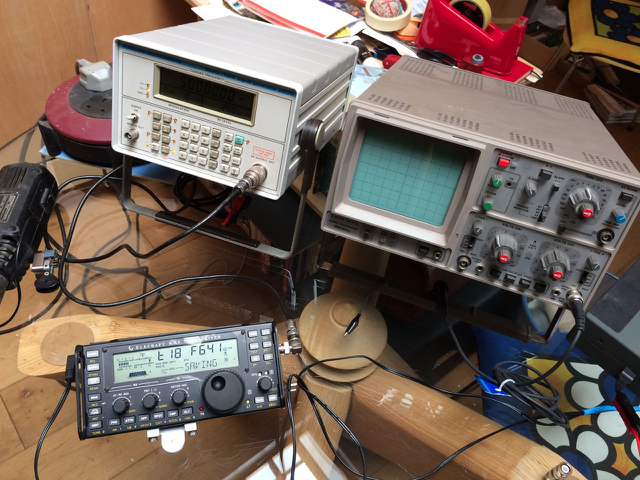
Not content with seeing volts I wanted to see some modulation. But how to get it into the scope? A google got me to a site that Bob Heil, he of the microphones, had put up a design for a box that takes a sample of the RF from the TX output without blowing up the scope.
So fearing I might be replacing the club one as it went up in smoke I pressed on regardless and using the component tester managed to track down the right capacitors. or in fact two that add up to the right value in parallel. And a trio or resistors that added up to the right sort of numbers.
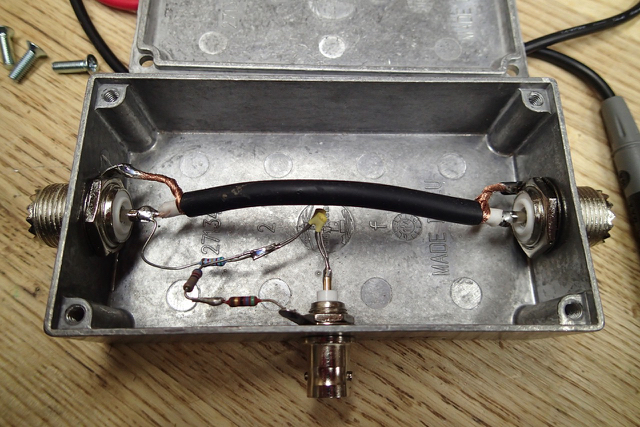
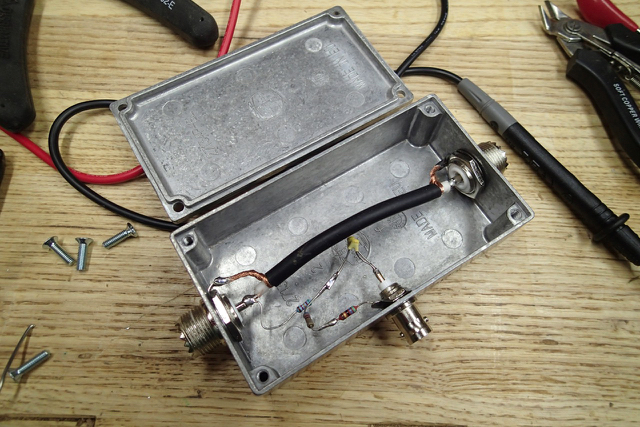
I got a cast box for RF screening and went about copying the hell plans.
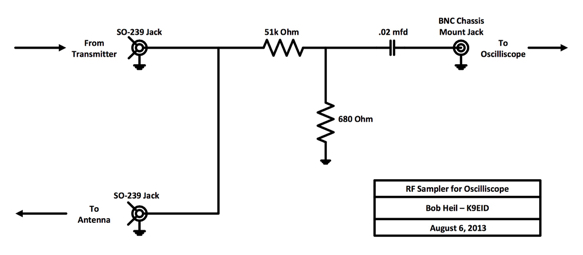
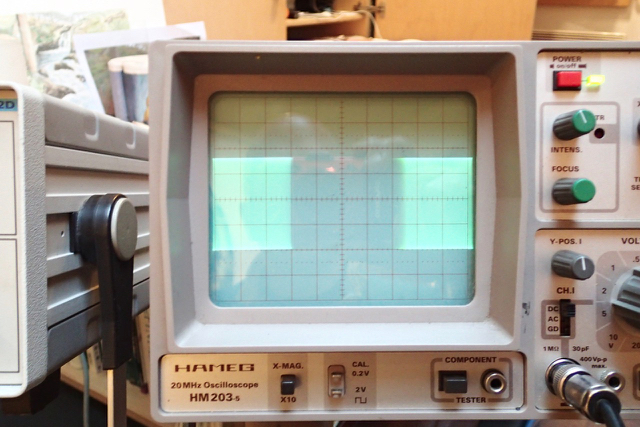
This looks something like this when put together
Then for the big test….or bang.
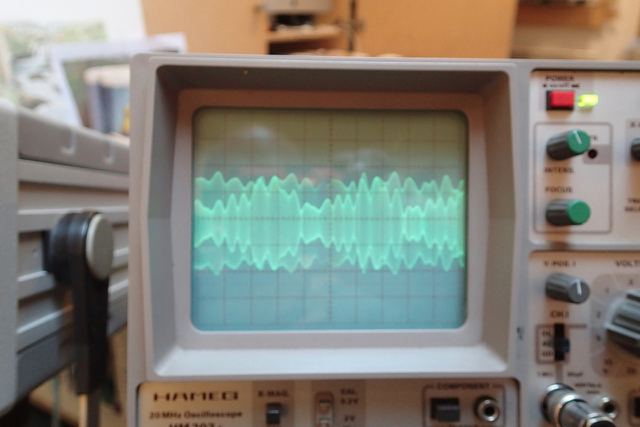
I got the KX3 out and plugged the tx out into th boxm the other lead into a dummy load and took the scope tap off to one of the scope inputs.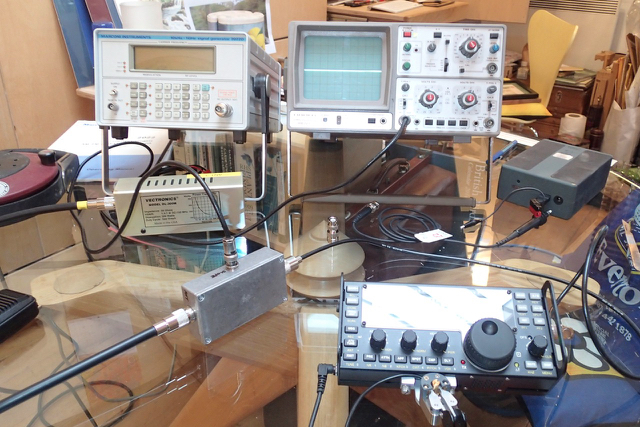
Put the radio onto AM and .1W (just in case) and this is what you get
Pretty eh.. Then SSB
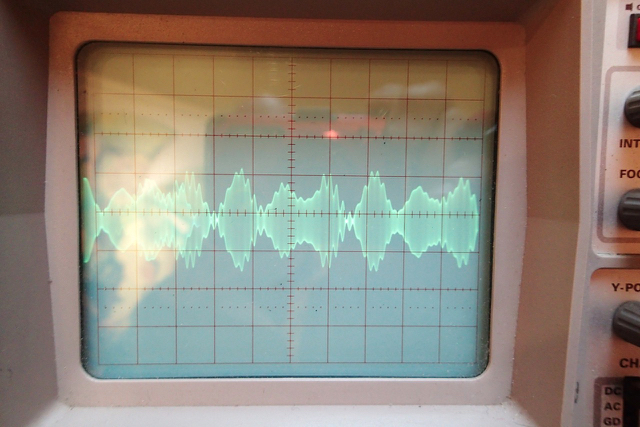
You can’t photograph the slopes that we learnt about well on CW
But they are definitely there.
All in all a great 1 hour project and now I can’t wait to get myself a scope and have someone tell me what I need to be looking for re over modulation etc.
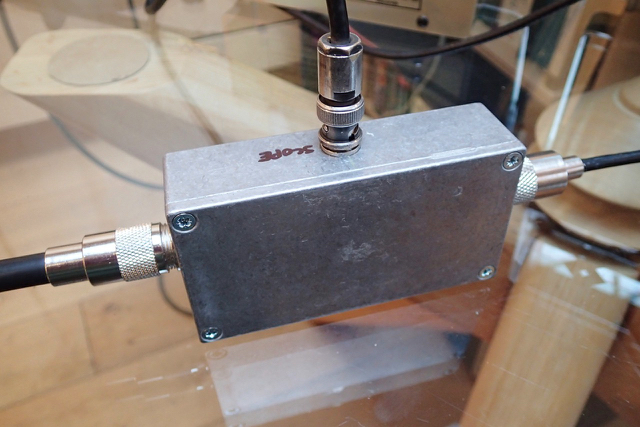
Not content with seeing volts I wanted to see some modulation. But how to get it into the scope? A google got me to a site that Bob Heil, he of the microphones, had put up a design for a box that takes a sample of the RF from the TX output without blowing up the scope.
So fearing I might be replacing the club one as it went up in smoke I pressed on regardless and using the component tester managed to track down the right capacitors. or in fact two that add up to the right value in parallel. And a trio or resistors that added up to the right sort of numbers.
I got a cast box for RF screening and went about copying the hell plans.
This looks something like this when put together
Then for the big test….or bang.
I got the KX3 out and plugged the tx out into th boxm the other lead into a dummy load and took the scope tap off to one of the scope inputs.
Put the radio onto AM and .1W (just in case) and this is what you get
Pretty eh.. Then SSB
You can’t photograph the slopes that we learnt about well on CW
But they are definitely there.
All in all a great 1 hour project and now I can’t wait to get myself a scope and have someone tell me what I need to be looking for re over modulation etc.
Comments
A proper Ham
23/07/15 13:46 Filed in: Shack Stuff | Radios
I feel like a proper radio ham now I have used some “test equipment”.
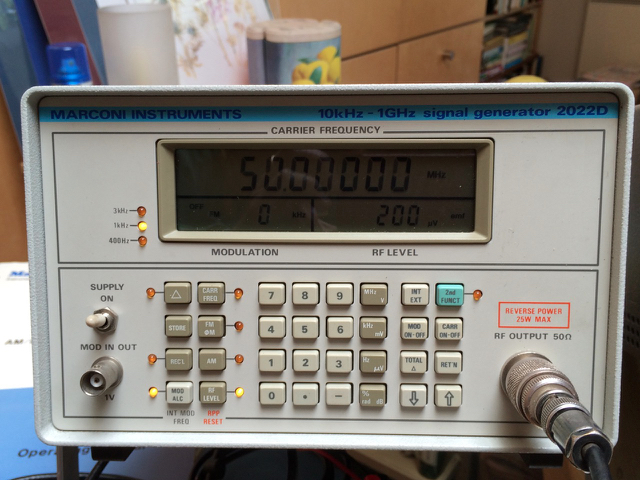
Oh yes. A signal generator no less. Wow, I hear you say………possibly.
The KX3 is a SDR radio and comes in kit form so there are various combinations of boards that you can put in it. All of these affect the way that the oscillator performs in relation to the temperature of the radio (watch out we might be getting out of our depth here).
You can calibrate an offset to adjust what the oscillator is producing against the temperature. Because this is a long winded process it comes with a standard calibration which is ok for HF but on 2M SSB which comes via a transponder board and narrower modes such as RTTY and PSK you can find the radio drifting off. A couple of people have mentioned this when I have operated on 2M SSB for any length of time on it.
There is a calibration process built into the SDR ….how brilliant is that. So I borrowed the Sig Gen (got the lingo already) from Jeremy, many thanks. Basically what you do is inject a 50mhz CW carrier into the radio and set is calibrating as you change the temperature. You cool it in the fridge and then get it out and warm it up with a heat gun.
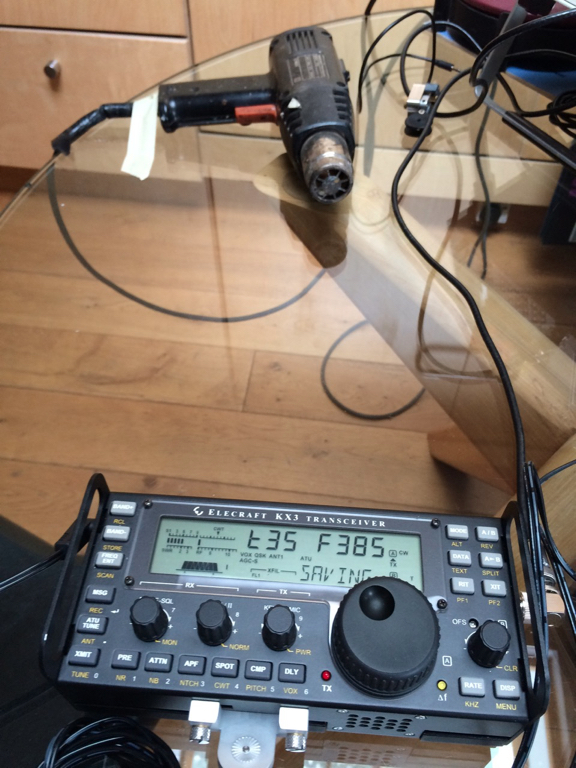
Here you can see the temp pf the oscillator at 35c and the actual frequency of it. 385 thnigamijigs.
When it is all calibrated you can watch , and hear, the frequency stabilise as the temp drops.
The proof of the pudding is yet to bake as we go and plug it in and search very hard for someone to speak to on 2M to test it out. I will let you know.
UPDATE: yes it works. just had a nice QSO with wales and didn’t drift off a bit.
Just wait till I work out what to do with the oscilloscope!
Oh yes. A signal generator no less. Wow, I hear you say………possibly.
The KX3 is a SDR radio and comes in kit form so there are various combinations of boards that you can put in it. All of these affect the way that the oscillator performs in relation to the temperature of the radio (watch out we might be getting out of our depth here).
You can calibrate an offset to adjust what the oscillator is producing against the temperature. Because this is a long winded process it comes with a standard calibration which is ok for HF but on 2M SSB which comes via a transponder board and narrower modes such as RTTY and PSK you can find the radio drifting off. A couple of people have mentioned this when I have operated on 2M SSB for any length of time on it.
There is a calibration process built into the SDR ….how brilliant is that. So I borrowed the Sig Gen (got the lingo already) from Jeremy, many thanks. Basically what you do is inject a 50mhz CW carrier into the radio and set is calibrating as you change the temperature. You cool it in the fridge and then get it out and warm it up with a heat gun.
Here you can see the temp pf the oscillator at 35c and the actual frequency of it. 385 thnigamijigs.
When it is all calibrated you can watch , and hear, the frequency stabilise as the temp drops.
The proof of the pudding is yet to bake as we go and plug it in and search very hard for someone to speak to on 2M to test it out. I will let you know.
UPDATE: yes it works. just had a nice QSO with wales and didn’t drift off a bit.
Just wait till I work out what to do with the oscilloscope!
A much less saucy QSL card
17/07/15 13:27 Filed in: Shack Stuff
Today I received a QSL card to redress the naughtiness of the last one.
It might be of interest after the article in this months PW.
This was one of those where you just happen to be there when it happens, not out shopping like someone! In fact I didn’t know how sought after it was until I was told later
Much less saucy but much the better for that.


It might be of interest after the article in this months PW.
This was one of those where you just happen to be there when it happens, not out shopping like someone! In fact I didn’t know how sought after it was until I was told later
Much less saucy but much the better for that.
Best QSL Card so far ?
14/07/15 08:38 Filed in: Shack Stuff
Received today from Macedonia

It is good to see that some places have yet to catch the politically correct bug.
I suggested to Mrs LDZ that she could help me re do my card………..I might be walking again in a week or so.
It is good to see that some places have yet to catch the politically correct bug.
I suggested to Mrs LDZ that she could help me re do my card………..I might be walking again in a week or so.
Testing Testing
12/07/15 09:59 Filed in: Antennae | Shack Stuff
Ok so we have got the beam down again and the balun off
Chickens mind your heads!

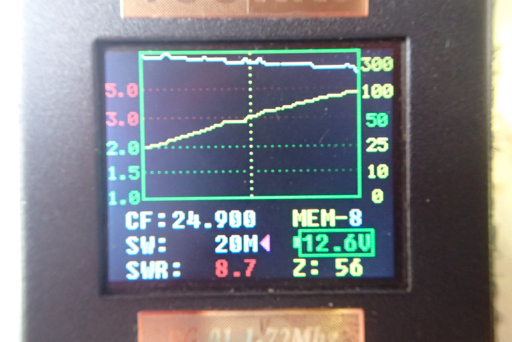
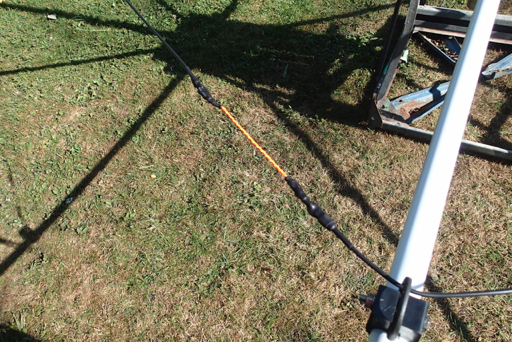
Thats the balun which I have taken off and put the beam back up. And a check on the meter with the balun shows no resonance and a short.
See the comparison without the balun below.
The fix was super simple. I thought I was going to have to take it all apart but it was just a strand of the centre core touching in the PL259 .
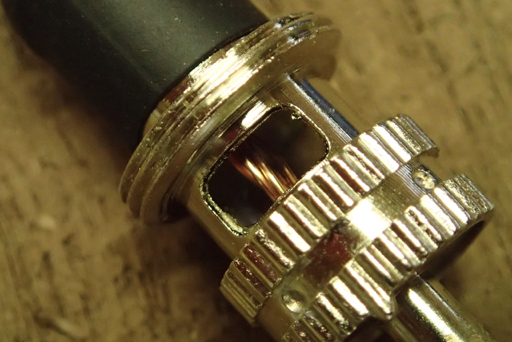
I have pushed it back and bingo we are in business. I will check again and it might be sensible to re do the connector but there is little movement in it as it is fixed to the centre post.
Here is the overall plot without the balun for these readings
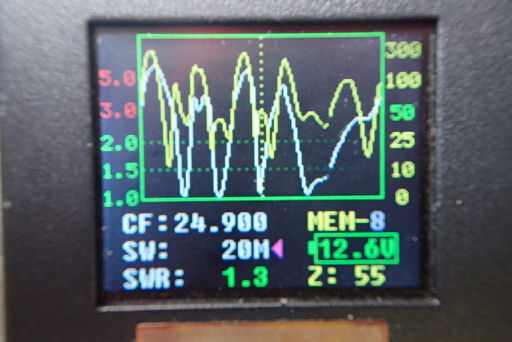
and if we look at the individual plots you will see they are spot on
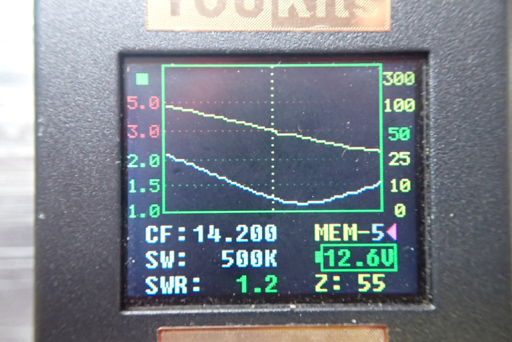
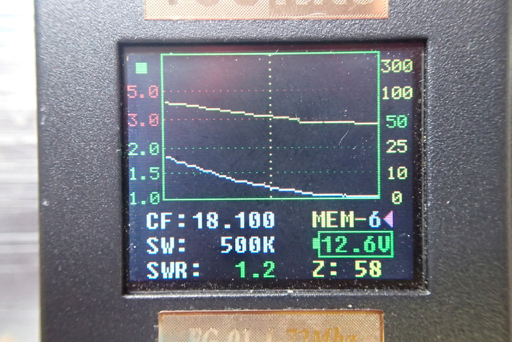
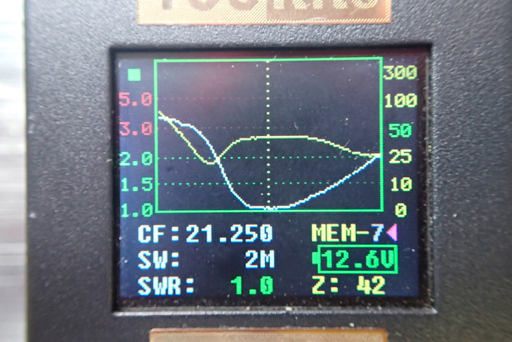
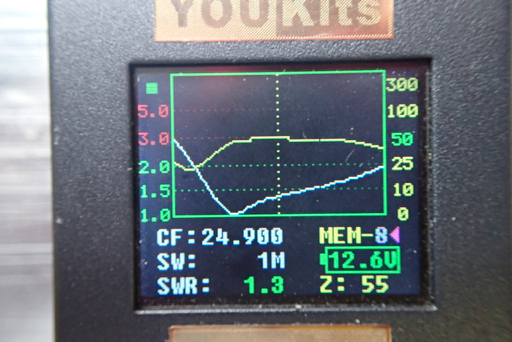

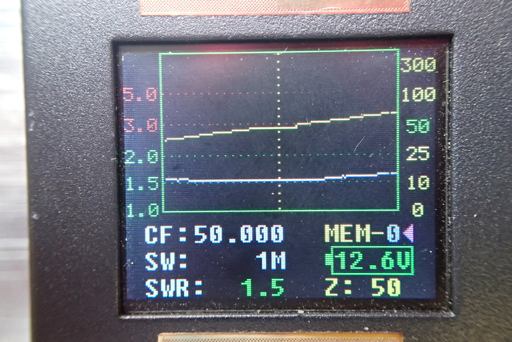
So there you are a quick fix and we are ready to take it down (again) and put the balun back on for a test. Although the impedance looks pretty fine to me without any help.
Chickens mind your heads!
Thats the balun which I have taken off and put the beam back up. And a check on the meter with the balun shows no resonance and a short.
See the comparison without the balun below.
The fix was super simple. I thought I was going to have to take it all apart but it was just a strand of the centre core touching in the PL259 .
I have pushed it back and bingo we are in business. I will check again and it might be sensible to re do the connector but there is little movement in it as it is fixed to the centre post.
Here is the overall plot without the balun for these readings
and if we look at the individual plots you will see they are spot on
So there you are a quick fix and we are ready to take it down (again) and put the balun back on for a test. Although the impedance looks pretty fine to me without any help.
Hex Update
12/07/15 08:58
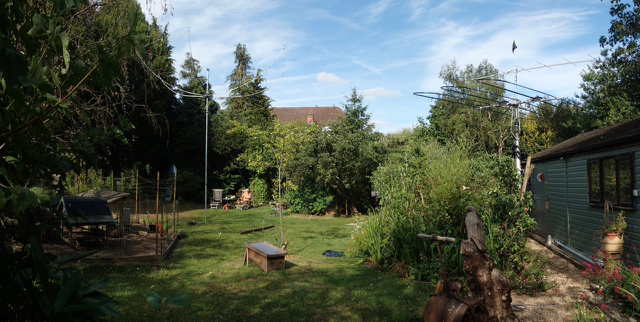
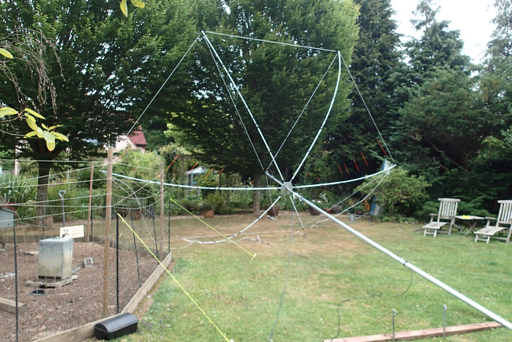
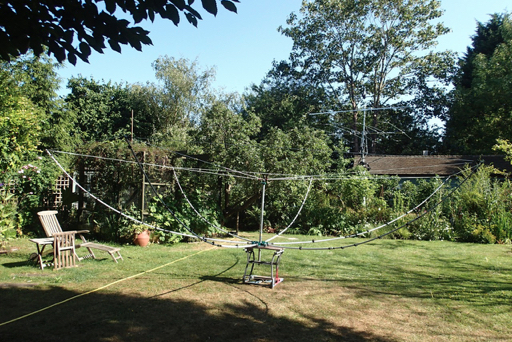
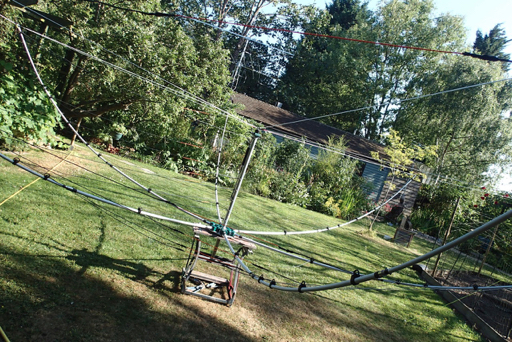
I have got the hex beam up for a trial on the spider mast. Not all the way up at 7m as it is a B**** to get uo on your own, if you know what I mean. You can do I one handed but need something to push the mast against and the first time i tried it looked ok then i tuned it east and It cane down and hit me on the head. Lesson 2 do the mast up tight (socket now ordered to do this)
Next time, picture this. You have the mast in your hand and the beam behind you. Lift and push the mast and up it goes , providing you have the guys sorted in the first place. Problem is you can’t see it going up so when you get your breath back and look the think has un hooked itself and the spreader lines are flapping in the breeze. Down we come again. Anyway there clearly is a technique to all this and by the time you have it sorted you will be a bit fitter. None of this applies if you have Mrs LDZ at home or are making this a permanent installation.
I will post some more detailed comparisons later as soon as I sort out the first issue which is the balun. (I think). On first try I couldn’t get any bands to resonate and on testing the balun shows continuity between the cores. Now some baluns are made to work this way and I am not sure if this one is. So I have mailed Waldi to see.
When I regain my strength to take it down again I will take the balun off and take it apart to see what is what but for the meantime I have bypassed it and get very good SWR readings on all the bands it covers. 6 to 20M including the WRAC bands.
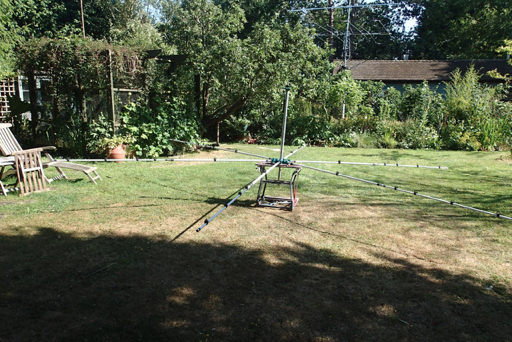
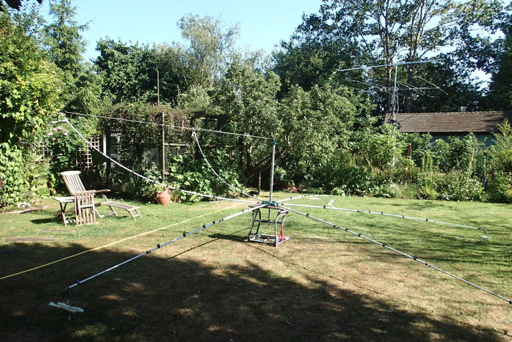
Here is a short comparison size wise between the hex and StepIr.
I then connected it up to the FT5000 for a reception test. And yes , as usual when you want to do this sort of thing it is contest madness, so no chance of a QSO to test it out seeing as the WRAC were dead so we listened to a Brazilian station on 10M for a comparison
I would say that there is very little in it from this basic comparison but as soon as the balun issue is sorted we can give a head to head hopefully with a station for a QSO. Clearly this is not going to be totally un biased as I have shelled out multi quid for the DB11 so one hopes it is worth it for more that the 180 degree flippability - which is actually one of the best bits about it when you are searching the bands or get someone returning on the backside of the beam.
It's Arrived
11/07/15 09:26 Filed in: Antennae | Shack Stuff
Oh yes.. we have all been waiting for the hex beam. And it is finally here.
I had intended to make this my home base antenna when I ordered it at the beginning of the year but could not bear the wait to get a better performing antenna than my trusty Gap Titan, which the neighbours said had to go, came down.
As you know I was forced into a planning application for a telescopic mast and with no Hex in sight went to Ron at Vinecom for a StepIr DB11. Which is brillinant. No doubt about that so I will say it again. It is BRILLIANT.
So question, if I can get any sort of comparison set up here, can we see how the Spidex hex beam performs using the DB11 as a comparison. Of course coastwise there is none. The hex is sub £500 and the DB11 tops £2.5k. (no telling Mrs LDZ now).
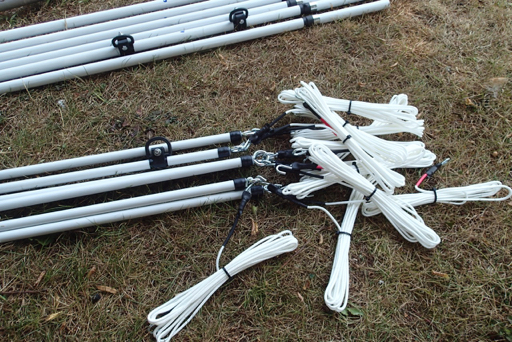
So here is what you get in Waldi’s hex. and if i remember correctly the one I have is the light version. It is eventually going to be put to use for field days and the mini dxpeditions.
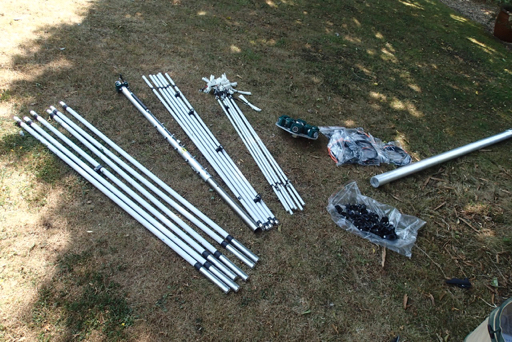
Here are the contents. the fibreglass spreaders in three parts each, the centre hub and the centre post to school you connect the wire elements.
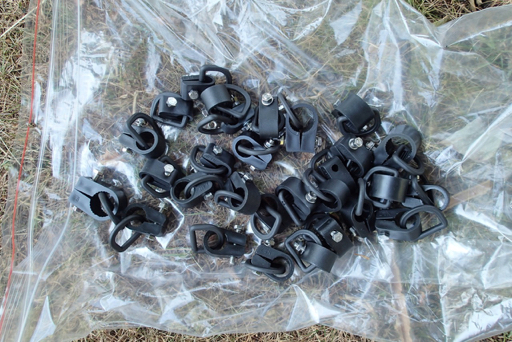
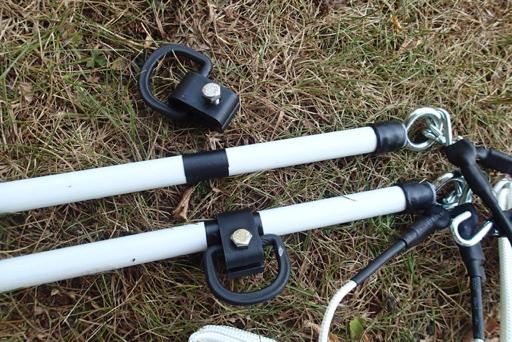
The first job, which gets done only once is to put the plastic hooks onto the spreaders and Waldi has done one of each for you to follow. So just use a marker and mark each tube, wine a bit of tape around it and put the clamp and “D:” ring on. This will take an hour or so. Make sure they are lined up on the one with 4. Otherwise this is straightforward. It all is really.
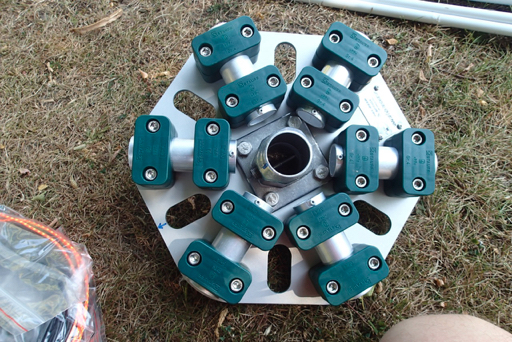
Right, you are back with me after having done that. Now here is the fun bit. Slotting everything together.
Sit the hub on a stand of some sort to stop it rolling about and put the post bit into it.
Then you are free to slot the spreaders (possibly not the right technical term) in. They are numbered but as far as I can see are all the same so I doubt if is would make any difference where they went.
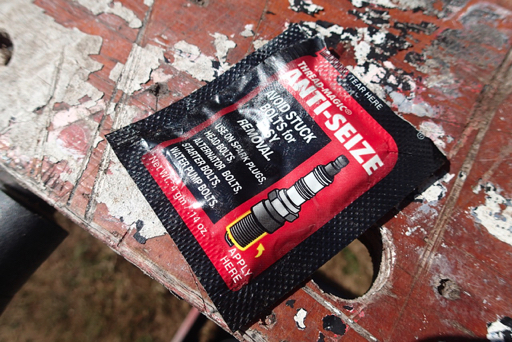
One thing that you might want to do if you are going to be taking it apart a lot, like me, is to treat the aluminium to aluminium connections with some anti-seize.
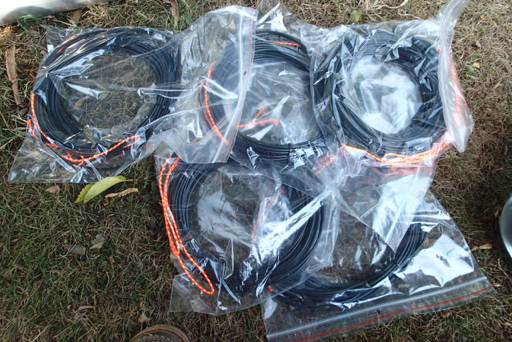
Now simply take the lines already on the end of the spreaders and hook them onto the eyelet on the top of the centre post.
With that done, and it takes seconds to do the whole thing, you are ready to thread the wires.
Now this is where I am going to work on making this easier for the portable work. With the design as it is you have to thread each element through each D ring. What would be good would be to be able to clip to the d ring as you go round thus not having to feed the whole element through each ring. I will let you know who that idea works out.

That is the 6m element on. Basically like a folded Moxon. You cants see the orange bits which is where the driven and reflector are separated.
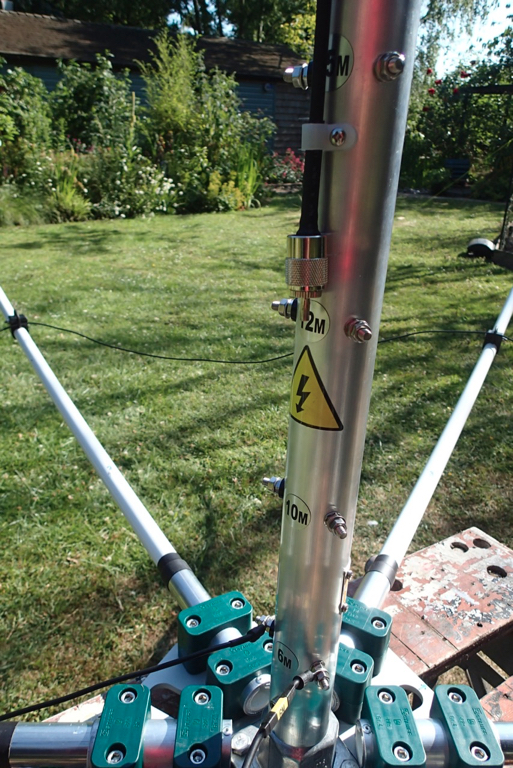
Thats the connection to the centre post. Again to make it easy in the field I will swap the just for wing nuts.
And that’s as far as we have got before having to go out. All in all a couple of hours and its done.
It is bigger than the DB11, which surprises me but much lighter.
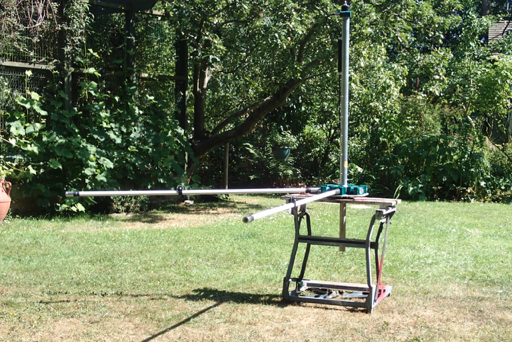
I have the Spidex aluminium pole as well so we will be diving that a whirl and trying to get the thing up in the garden to evaluate it soon. Check back and see as we will cover a quick test as well as taking it apart and any modifications for quicker field assembly.
I had intended to make this my home base antenna when I ordered it at the beginning of the year but could not bear the wait to get a better performing antenna than my trusty Gap Titan, which the neighbours said had to go, came down.
As you know I was forced into a planning application for a telescopic mast and with no Hex in sight went to Ron at Vinecom for a StepIr DB11. Which is brillinant. No doubt about that so I will say it again. It is BRILLIANT.
So question, if I can get any sort of comparison set up here, can we see how the Spidex hex beam performs using the DB11 as a comparison. Of course coastwise there is none. The hex is sub £500 and the DB11 tops £2.5k. (no telling Mrs LDZ now).
So here is what you get in Waldi’s hex. and if i remember correctly the one I have is the light version. It is eventually going to be put to use for field days and the mini dxpeditions.
Here are the contents. the fibreglass spreaders in three parts each, the centre hub and the centre post to school you connect the wire elements.
The first job, which gets done only once is to put the plastic hooks onto the spreaders and Waldi has done one of each for you to follow. So just use a marker and mark each tube, wine a bit of tape around it and put the clamp and “D:” ring on. This will take an hour or so. Make sure they are lined up on the one with 4. Otherwise this is straightforward. It all is really.
Right, you are back with me after having done that. Now here is the fun bit. Slotting everything together.
Sit the hub on a stand of some sort to stop it rolling about and put the post bit into it.
Then you are free to slot the spreaders (possibly not the right technical term) in. They are numbered but as far as I can see are all the same so I doubt if is would make any difference where they went.
One thing that you might want to do if you are going to be taking it apart a lot, like me, is to treat the aluminium to aluminium connections with some anti-seize.
Now simply take the lines already on the end of the spreaders and hook them onto the eyelet on the top of the centre post.
With that done, and it takes seconds to do the whole thing, you are ready to thread the wires.
Now this is where I am going to work on making this easier for the portable work. With the design as it is you have to thread each element through each D ring. What would be good would be to be able to clip to the d ring as you go round thus not having to feed the whole element through each ring. I will let you know who that idea works out.
That is the 6m element on. Basically like a folded Moxon. You cants see the orange bits which is where the driven and reflector are separated.
Thats the connection to the centre post. Again to make it easy in the field I will swap the just for wing nuts.
And that’s as far as we have got before having to go out. All in all a couple of hours and its done.
It is bigger than the DB11, which surprises me but much lighter.
I have the Spidex aluminium pole as well so we will be diving that a whirl and trying to get the thing up in the garden to evaluate it soon. Check back and see as we will cover a quick test as well as taking it apart and any modifications for quicker field assembly.
UKAC 144mhz
08/07/15 08:58 Filed in: Contests
Last nights 2m contest was frustrating working from home as opposed to a Welsh hill.
You are really hemmed in by the number of close stations. Nevertheless we gave it a go, which after all is the point.
Furthest was Penzance and thanks to G4PPT/P for that. Funny enough his call is one I was searching for matching surnames and all that.
My Landrover plate is PPT as well.
TC
You are really hemmed in by the number of close stations. Nevertheless we gave it a go, which after all is the point.
Furthest was Penzance and thanks to G4PPT/P for that. Funny enough his call is one I was searching for matching surnames and all that.
My Landrover plate is PPT as well.
TC
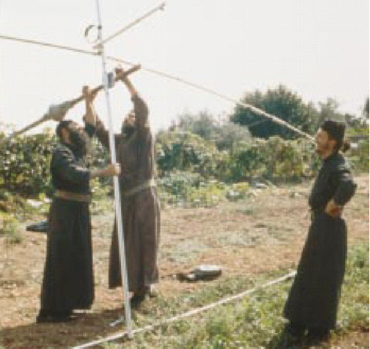
Mt Athos
05/07/15 19:00 Filed in: dx
I thought I would admit to how green I am when it comes to this radio lark.
I have a pretty good programme on the Mac which tells me when a spot comes up in a DX entity that I have not “got”. And it popped up the other day for a place called Mount Athos.
Anyway I tuned in and there was a great shouting mass of you know who piling up the pile ups. Luckily Monk Apollo, he who operates there, decided to work split frequencies and before the mob could get their radios in the right place I managed to bag him.
I didn’t think any more of it until I mentioned to someone who told me it was very sough after, So sought after, in fact, that he turned around from his shopping trip to go on the hunt.
Funny all this beginners luck….but mind you with this Greek business maybe I won’t get my QSL after all.